This article demonstrates how to deploy an application into Azure App Service using Azure DevOps (VSTS) continuous integration/continuous delivery (CI/CD) pipeline.
In this article, you’ll create a sample environment to:
- New build based on code commit to your Azure DevOps Repo.
- Automatically deploy your app into Azure.
Prerequisites:
- Azure Portal Account, Azure subscription and Azure DevOps (VSTS) account.
- Azure Resource Group.
- Create a web app in Azure. Make note of the app service URL—you need it later.
What is Azure App Service?
Azure App Service enables you to build and host web apps, mobile backends and RESTful APIs in the programming language of your choice without managing infrastructure. It offers auto-scaling and high availability, supports both Windows and Linux, and enables automated deployments from GitHub, Azure DevOps or any Git repo.
Creating Resource Group in Azure
 Once you have a subscription in Azure, you need to create a resource group to manage resources in Azure. The best practice is to maintain a separate resource group for each environment (DEV, INT, QA, STAG, PERF, PROD) and follow the proper naming conventions. To create a resource group, select Resource Group from left-side blade, click on +Add, then select Subscription, give a proper name to the resource group and click on Review + Create.
Creating App Service
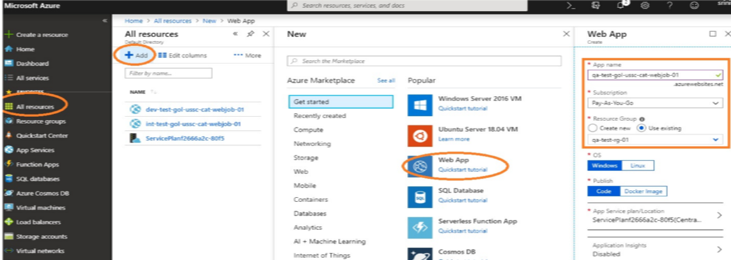 Click on All resources from the left-side blade of the panel and click on Add, then select Web App and give a proper name to your app service. Then select Subscription and select the existing resource group. Keep the remaining option as default. and click on Create.
Once you have created the app service, click on that app service and go to Overview. There you can identify all the details that belong to this app service, including status, resource group, subscription and URL (please make a note of this; you’ll need it later).

Creating Service Principal
When an application needs access to deploy or configure resources through ARM or VSTS in Azure, you’ll need to create a service principal, which is a credential for your application.
Go to Azure Active Directory -> App registrations -> New application registration, then give a name to the service principle, select application type and give it a URL of your choice. After creating the app registration, go to Settings from that service and make note of application ID, then go to Keys create a key and copy the secret value. (Note: It doesn’t appear later, so please store it in safe place.)


Create a New Project in VSTS
The first step is to create an account in Azure DevOps (VSTS), then follow the steps below to start an application deployment. Here I’m taking sample open source java-based code from GitHub repository and importing it to Azure DevOps repo. (You can push your own source code into repo.) It is a simple multi-module Maven project. The application is a very simple online version of Conway’s “Game of Life.”
 To create a new project, click on Create new project, give a proper name to your project and select create. Then go to Repos, click on Import, then select source type, type in the above URL in the Clone URL tab and select Import. The source code will import into your repository.
 We need give service connections to our project, so go to project settings from the bottom of blade in our project home directory and then select Service Connections -> New Service connection -> Azure Resource Manager. Click on “Use the full version of the service connection dialog” from the pop-up, then paste the Application ID into the Service principal client ID tab and the secret key value into the Service principal key tab (which you saved during app registration creation). Then click OK.
 Creating a Continuous Integration (CI) Build
Go to Pipelines -> Build -> New Build Pipeline, then click on “Use the visual designer.” It will ask source code repo details, so select Azure Repos Git and select Team project, which you created at the start of the project, select Repository and branch name, then click Continue.


 Next, select a template Maven, type in the pipeline name and select Hosted VS2017 for the Agent pool, and click on pom.xml in the Maven POM file. There you can list the goal(s) as Clean Package and select Copy Files. At the contents section please enter **/*.war then go to Publish Artifact: drop, list the artifact name as Gameoflife and keep all remaining options as default values. Then, under Triggers, select Enable continuous integration and give branch filters listed at right, which enables the continuous integration feature. Once a developer commits their changes into master, the CI build will trigger automatically.
 Once the configuration is complete, click on Save and Queue from top of pipeline to trigger a CI build. (Every commit into master will trigger a new build.)
Creating Continuous Delivery (CD) Pipeline
 Go to Pipelines -> Releases -> New Release Pipeline, then select the template Azure App Service deployment, list the stage name as DEV and click on Add an artifact. Select project and source (build pipeline), then select default version as Latest, click on Add. Cick on Task (below the DEV), select Run on agent and select agent pool as Hosted VS2017, then click on the plus(+) symbol, search for template File Rename and select the .war file from source file and give it the new name ROOT.war.
 In the Display name box, list Azure App Service Deploy. In the Azure subscription field, you need to select a service principal name to authorize the resources. Then choose the App type and App Service name. In the Package or folder selection, select war file and rename it ROOT.war, because for java-based applications we need to deploy our app into a proper directory structure.
 Finally, select the template Azure App service manager and select the Restart option, making sure to select the same subscription and app service name you selected in the Azure app service deploy window. Click on Save, then click on Release -> Create a release -> select artifact build number -> create. Build will then trigger and deploy into the app service.
Now, your code is successfully deployed into Azure App Service.
You can access using app service URL from any browser (e.g., https://xyz-abc-webjob-01.azurewebsites.net) and you can check whether code is deployed successfully or not using below URL: https://xyz-abc-webjob-01.scm.azurewebsites.net.
— Srinivas Kudipudi